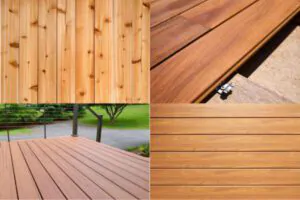
Staining a deck like a pro involves more than just slapping on some color. It’s about protecting your outdoor space from moisture and UV rays while giving it a stunning makeover. This guide dives deep into every step needed to achieve those perfect results, from preparing your deck by cleaning and choosing the right kind of stain, to mastering the application techniques for each part of your deck.
With the right approach, you can apply 2 to 3 coats of stain effectively, ensuring your deck withstands various elements. Using painter’s tape protects your home’s sides from accidental stains during the process.
Prior steps also include getting rid of all dirt and making sure the wood is clean, possibly even sanding it down for an ideal surface to work on. Remember, solid stains require thin layers, whereas semi-transparent options or clear sealers need even thinner applications to avoid future peeling or cracking.
Applying stain isn’t just about protection; it’s an art form that requires specific tools like stain pad applicators or brushes designed for decks. These ensure smooth coverage across your floorboards without leaving any spot untouched.
Always mix up that can before you start; this keeps the color uniform over every plank and rail.
Pressure washing beforehand gets rid of built-up grime and preps the wood so it soaks in all that protective goodness much better. To keep everything looking sharp year after year, regular checks and minor touch-ups go a long way in preventing damage from sun soak or water seepage.
Choosing high-quality products extends the life of both shine and shield against weather wear-out. Get ready to transform your outdoor living area!
Key Takeaways
- Clearing and cleaning your deck thoroughly is the first crucial step for a professional staining job. Remove all furniture, sweep off debris, and wash with a hose or pressure washer to ensure the wood is ready for stain.
- Choosing the right type of stain based on your deck’s material and exposure to elements like sun or moisture makes a big difference in both appearance and durability. Oil-based stains are great for deep penetration and protection, while water-based options offer ease of cleanup and resist mildew effectively.
- Applying stain correctly involves tackling railings and spindles first with a paintbrush for precision, then using rollers or pads on deck boards for even coverage. Remember to work in sections and follow the grain of the wood.
- Filling cracks before staining not only improves looks but also extends your deck’s life by preventing further damage from weather conditions. Using wood filler suited for outdoor decks ensures better resilience against wear and tear.
- Regular maintenance, including pressure washing, checking for wear signs like fading or peeling, and touching up as needed with matching stain, helps keep your deck looking its best over time. Choosing quality products that offer long-term protection saves effort and resources in maintaining an inviting outdoor space.
Preparing for Staining
Before you dive into staining your deck, setting the stage correctly is key. Start by clearing every piece of furniture and sweep off all debris to ensure a clean canvas. Next up, shield your home’s sides with painter’s tape and lay down coverings to catch any drips.
Choosing the ideal wood sealer comes next – consider the weather patterns in Colorado and consult consumer guides to find a product that will stand up to sun and snow alike. With these steps, you’re ready to move on, armed with garden hoses or power cleaning tools for a thorough washdown, ensuring your lumber is pristine before applying that first coat of stain.
Clear and sweep the deck
Grab a sturdy broom and start clearing your deck of any leaves, loose dirt, and other debris. This initial step sets the foundation for a flawless staining job by providing a clean surface.
Remember to get into every nook and cranny where dust and grime tend to hide. I learned quickly that doing this thoroughly makes a significant difference in how well the stain adheres and looks.
After sweeping, use a garden hose or pressure washer on a gentle setting to wash away any remaining dirt particles. Ensure all furniture and objects are off the deck to avoid missing spots.
From my own experience, taking time here avoids problems later when applying wood stain for protection against Colorado’s weather conditions.
Protect exterior walls
After you’ve cleared and tidied the deck, the focus shifts to safeguarding the exterior walls. This step is crucial as staining helps shield these surfaces from moisture and sunlight damage.
Drape a substantial drop cloth or plastic sheeting over nearby walls to prevent any accidental stain splashes. Such precautions keep your home’s appearance neat and ensure that only the wood intended for staining receives treatment.
Selecting an appropriate quality stain also plays a big part in protecting these external surfaces effectively. Test your chosen stain on an inconspicuous piece of lumber first. Doing so allows you to verify both the appearance and protective qualities before applying it broadly.
Proper preparation, including cleaning and smoothing (sanding) those slightly rough edges, sets up a solid foundation for this task, directly contributing to longer-lasting protection against environmental elements like rainwater or intense sun rays especially in Colorado’s diverse climate.
Choose the right stain for your deck
After ensuring the exterior walls are safeguarded, let’s focus on selecting an ideal stain for your deck. This choice is crucial as it influences not only the appearance but also the durability of your outdoor space.
With options ranging from oil-based to water-based stains, each offers unique benefits. Oil-based varieties penetrate deeply, offering robust protection against wear and tear, making them a practical choice for high-traffic areas.
Water-based stains, on the other hand, are easier to clean up and provide excellent resistance against mildew and fading caused by UV rays. Personal experience underscores the importance of considering the specific demands of Colorado’s climate when choosing between these types.
Armed with this knowledge, evaluate your deck’s material and usage before committing to a stain type. A recently sanded cedar deck might flourish under oil-based stain’s deep penetration abilities, while a pressure-treated structure could benefit more from water-borne stain’s protective qualities against elements like chromated copper arsenate without sacrificing aesthetic appeal.
Keep in mind that preparation plays a pivotal role; ensure that surfaces are meticulously cleaned with effective cleaners or homemade solutions for optimal staining results.
Staining Techniques
Mastering staining techniques ensures your deck not only looks fantastic but also stands the test of time. Learn to use a paintbrush or a spray device for railing, apply the stain evenly across boards with a brush, and tackle stairs with precision for that professional touch.
Staining the railing and other raised features
Tackling the handrails and spindles first sets you up for success. This approach ensures each nook and cranny receives an even coat of stain, creating a standout appearance that lasts.
Using a smaller paintbrush works wonders for these intricate areas, allowing precision while keeping drips at bay. Personal experience taught me the value of patience here; a rushed job leads to missed spots and uneven tones.
Moving on to other raised features like posts or decorative edges requires attention to detail. A combination of rollers and brushes proves effective—rollers cover large surfaces quickly, while brushes manage the finer points with ease.
Always move in the direction of the wood grain to enhance texture and ensure penetration. This method not only protects your deck but also elevates its beauty, making it a highlight of your outdoor space.
Staining the deck boards
Start by applying a generous layer of wood stain using a paint roller for an even coat across all deck boards. Work in sections to keep the application consistent and prevent any missed spots.
Use long, smooth strokes to apply the stain in the direction of the board grain; this technique helps the wood absorb more stain for better protection against UV and moisture damage.
Remember, achieving professional results requires patience—allow each coat to dry thoroughly before adding another.
Move onto staining edges and between boards with a smaller brush or sponge tool. This ensures every nook and cranny gets covered, offering your deck complete protection from weathering elements.
Applying 2 to 3 coats will seal in the beauty while extending your deck’s life, making it worth every minute spent on careful application.
Next up is taking care of stairs and vertical pieces for overall perfection.
Staining the stairs
Cleaning and smoothing any rough patches on the stairs is a crucial first step. Use a deck cleaner to ensure they’re free from dirt and grime. An orbital sander works well for making surfaces smooth without too much effort.
This prep work makes the stain look better and last longer.
Applying stain to the stairs might seem tricky, but choosing the right tools can simplify the process. A stain pad, deck scrubber, or paint roller are great choices for an even application.
Take your time with each stair to guarantee a finish that looks professionally done. Patience here pays off with impressive results that enhance your home’s outdoor appeal.
Tips and Tricks for a Professional Finish
Discover how to make your deck shine with a flawless finish using the right tools and techniques. A paint pad ensures smooth, uniform coverage while filling cracks properly protects your deck for years.
Keep reading to master these pro tips and transform your outdoor space into something you’re proud of.
Properly filling in deck cracks
Filling deck cracks correctly is crucial for keeping your deck in top shape. First, grab a broom and give the deck a good sweep. This clears away any loose dirt and debris. I learned the hard way that failing to clean out these spaces can lead to bigger problems down the road.
Next, use something like a screwdriver to dig out harder-to-remove stuff stuck in the cracks between boards. Trust me, spending time on this step makes a huge difference.
Once you’ve cleared everything out, it’s time to fill those annoying gaps. Choosing the right filler is key—I prefer using a wood filler designed specifically for outdoor decks because it stands up well against harsh weather conditions here in Colorado.
Apply the filler carefully into each crack, making sure not to leave any spaces unfilled. Smooth it out so it’s level with the rest of your deck surface; this ensures not just strength but also gives your stain job that professional look we’re all aiming for.
Using a paint pad for even coverage
After fixing any cracks in your deck, you’ll want to focus on getting that smooth, even stain all over. That’s where a paint pad comes into play. Think of a paint pad as your secret weapon for staining a deck like a pro.
This tool glides across the wood smoothly, laying down an even layer of stain without leaving streaks or patches. Attach the paint pad to an extendable handle and you can easily reach every part of your deck without straining your back.
Paint pads are better than traditional brushes because they spread the stain evenly and efficiently. Plus, using one can keep the wood on your deck looking great for longer by helping avoid peeling and fading caused by uneven application.
For those tricky spots like railings or spaces between boards, consider using a staining sponge for precise control. With these tools in hand, achieving perfect coverage across your entire deck becomes much simpler and faster – giving you professional-looking results with less effort.
Maintenance and Care
Keep your deck looking sharp by staying on top of its upkeep: regular washing with a high-pressure hose and keeping an eye out for areas that need a quick touch-up will do wonders.
Always pick the best sealants to shield your deck from the elements, ensuring it stands strong against time and use. This way, you’ll always have a beautiful outdoor space ready for enjoyment.
Pressure washing before staining
Pressure washing your deck is a crucial step before you apply any wood stain. This process scours away layers of grime, mold, and old stains that have built up over time. Using a high-pressure water spray makes the wood ready to soak up the new stain evenly.
This means your deck not only looks fresher but also wears the stain longer and better.
After power washing, give your deck some time to dry thoroughly. Dry wood absorbs stains much better than damp wood does. This wait ensures every nook and cranny gets an even coat of color, making your staining job look sharper and last longer.
Use this technique to get ahead in protecting and beautifying your wooden deck with less effort.
Regularly checking and touching up the finish
Inspect your deck every few months to catch any issues early. Look for signs of wear, like fading or peeling. Addressing these problems as soon as they appear keeps the wood protected and extends the life of your stain job.
Use a brush or cloth when touching up areas that need it, ensuring you match the original stain shade to maintain a uniform appearance.
Before applying touch-up stains, clean the affected area with a gentle cleaning agent to remove dirt and debris. This prep step ensures the fresh stain adheres well and blends seamlessly with existing coverage.
Always check weather forecasts before starting; conditions should be dry for at least 24 hours after application to allow the stain to set properly on your wooden surface.
Choosing the right products for long-term protection
After ensuring your deck looks impeccable by regularly checking and touching up the finish, the next step significantly focuses on preserving its beauty and durability. The key lies in selecting exceptional quality products that promise long-term protection.
From personal experience, I’ve learned that not all wood stains are created equal. Choosing a high-grade stain is crucial for keeping water out of the timber and shielding it from harsh ultraviolet sun damage as well as moisture harm.
During my first staining project, I used a consumer-recommended sealer which provided an extra layer of defense against Colorado’s unpredictable weather. This choice made all the difference, allowing my deck to withstand heavy snowfall without showing signs of wear.
For those considering this task, remember applying pressure-washing before staining is essential for removing any old flaking stain or mildew lurking between boards. Combining this with a top-rated paint sprayer can streamline the application process, turning what seems like an arduous task into a manageable DIY project.
Furthermore, integrating these tools not only assures even coverage but also penetrates deep into the wood pores for optimal protection. Regular maintenance paired with premium protective products ensures your deck remains inviting and resilient year after year.
Conclusion
Staining your deck can transform its look, turning a dull outdoor space into a vibrant area for relaxation and entertainment. By choosing the right stain, protecting surrounding areas with painter’s tape, and applying coats patiently, you ensure lasting beauty and protection.
Techniques like using a paint applicator pad help achieve even coverage that looks professional. Regular care will keep your deck looking great year after year. Dive into this project with confidence; your stunning deck awaits as a reward for your hard work and patience.
FAQs
1. What do I need to start staining my deck?
To begin, gather your inventory: a high-quality stain for deck protection, a mop or applicator for even coverage, and any necessary cleaning supplies to prepare the surface. Consumer reports can guide you in choosing the best products.
2. How do I ensure my deck is ready for staining?
Ensure your deck is clean and dry. Remove any dirt or debris that could prevent the stain from adhering properly. This step is crucial for achieving perfect results.
3. Can I apply stain over an already stained deck?
Yes, but first check the condition of the existing stain. If it’s peeling or flaking, you’ll need to remove it before applying a new coat to achieve a smooth finish.
4. How long does it take for the stain to dry on my deck?
Drying times vary based on weather conditions and the type of stain used. Generally, wait at least 24 hours before using your freshly stained deck to ensure it’s completely dry and protected.